Usamos cookies para ofrecerle una experiencia más personalizada y fluida. Al visitar este sitio web, acepta nuestro uso de cookies. Si prefiere no aceptar cookies o necesita más información, visite nuestra Política de privacidad.
Cookies necesarias Estas cookies son esenciales para el correcto funcionamiento del sitio web y no se pueden desactivar.
Cookies analíticas Estas cookies nos ayudan a comprender cómo los visitantes utilizan nuestro sitio web.
Cookies de marketing Estas cookies se utilizan para realizar un seguimiento de los visitantes y mostrar anuncios relevantes.
Cookies de redes sociales Estas cookies te permiten compartir páginas y contenido en redes sociales.
Si está completamente seguro de la categoría de su pregunta, puede elegir más abajo una de las categorías para preguntas más frecuentes. Catálogo de Preguntas más frecuentes:
Resultados:
P (Q&A-188|549):
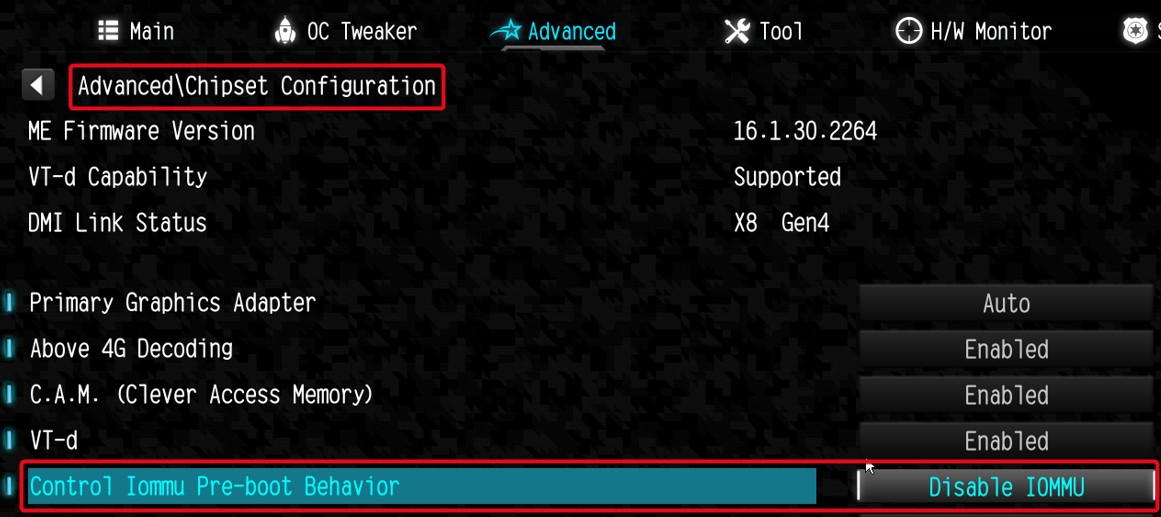
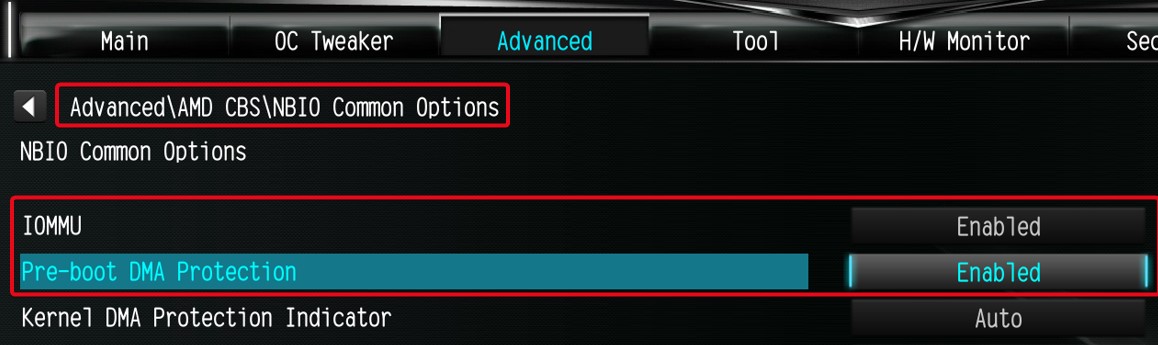
I am looking for Pre-boot DMA Protection option, but I cannot find it in the BIOS interface. Where can I locate this option?(12/16/2025)
R:The option name varies across different platforms. Please refer to the following screenshots to identify the correct option and its location in the BIOS menu.
Intel platform
● Intel 600, 700 series
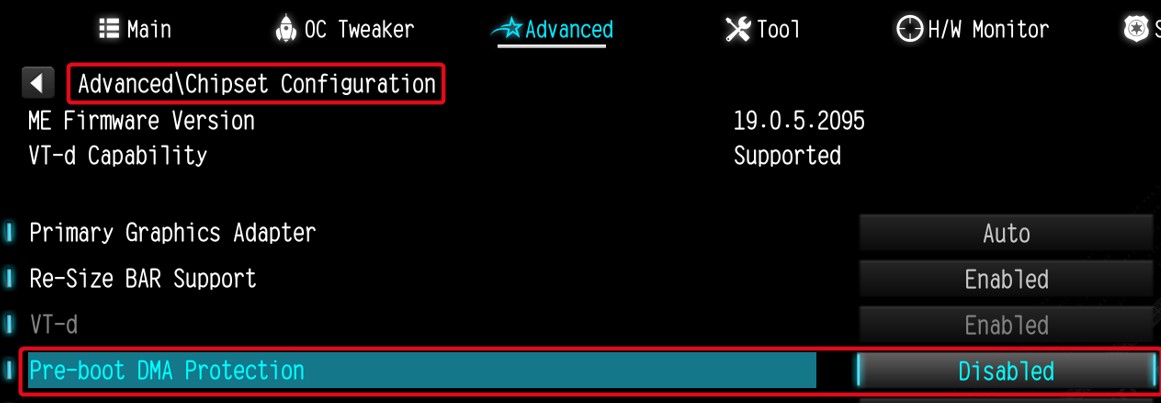
● Intel 800 series
Note:
Please first update BIOS to the latest version to obtain this option on Intel 600, 700 and 800 platforms.
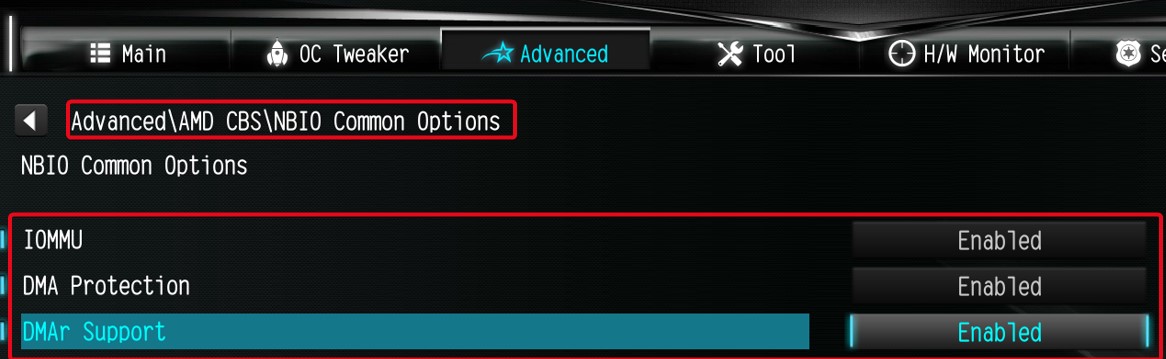
AMD Platform
● AM4 series
● AM5 series
Users can enable this option if they encounter game‑related or security‑related problems.
#DMA #Pre-boot #IOMMU #DMA Protection
P (Q&A-180|536):
How can I allow the cTDP of my 9700X/9600X to boost to 105W?(9/20/2024)
R:To adjust the cTDP of the 9700X/9600X to 105W, please download a BIOS version with AGESA code 1.2.0.2 or later from ASRock's official website.
After updating the BIOS, go to OC Tweaker and enable the option to set the TDP to 105W. Please note that not all AM5 motherboards might support this option.
#9700X #9600X #AM5 #X670 #TDP #105
P (Q&A-176|531):
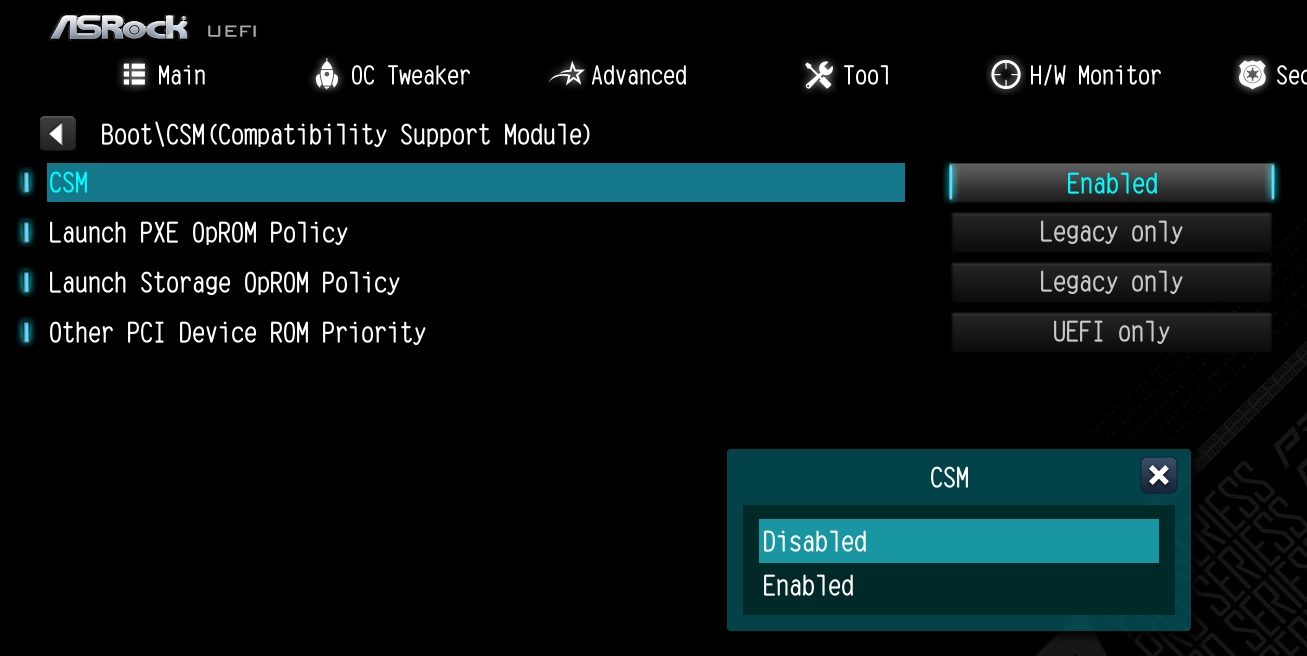
My software requires Secure Boot to be enabled. How can I set it up?(8/16/2023)
R:Please follow the steps below to enable Secure Boot.
Step 1.
Please press the "F2” key during POST to enter BIOS setup.
Go to Boot\CSM (Compatibility Support Module) and set "CSM" to "Disabled".
Press the "F10” key to save configuration changes.
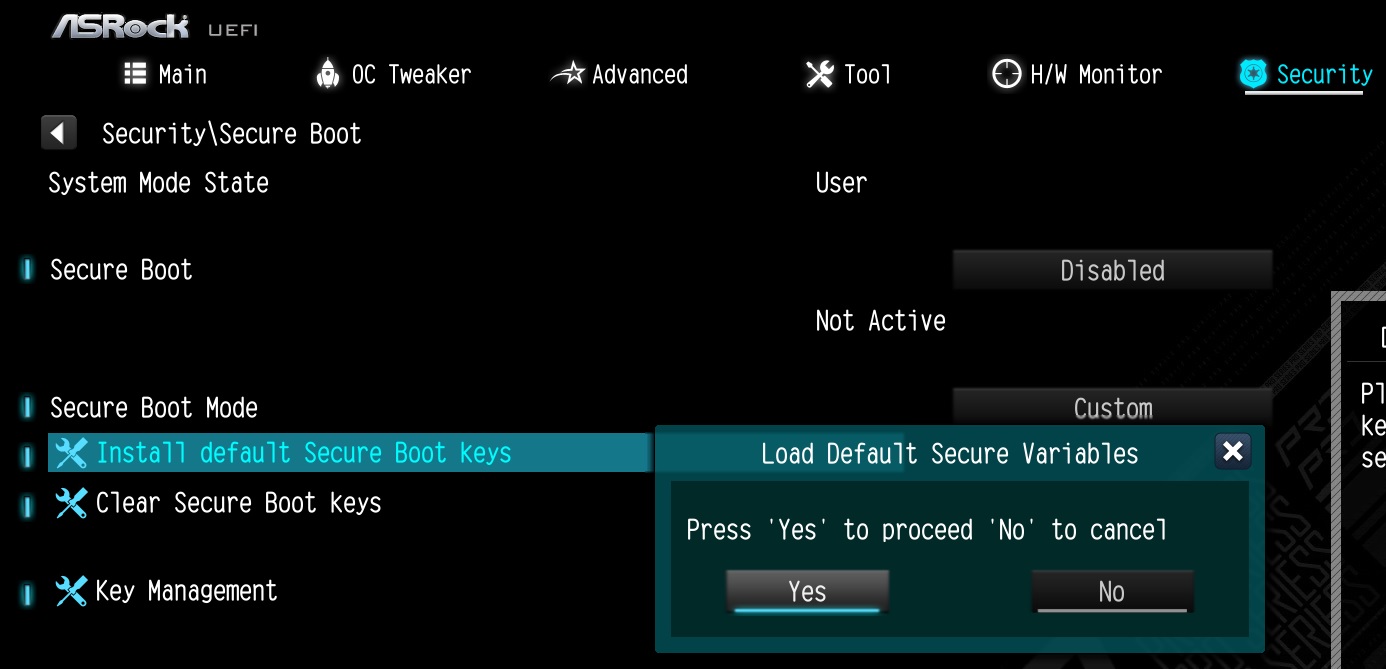
Step 2.
Go to Security\Secure Boot and set "Secure Boot Mode" to "Custom".
Step 3.
Please press "Install default Secure Boot keys" and select "Yes" to install Secure Boot keys.
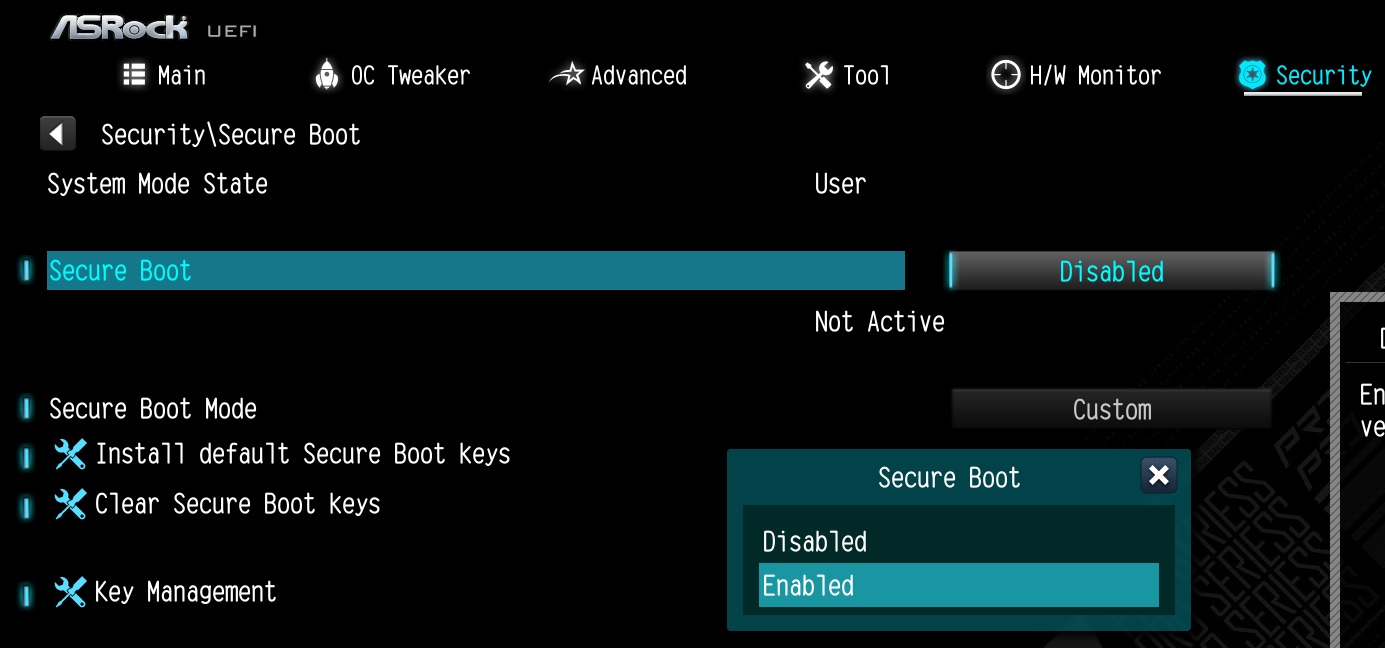
Step 4.
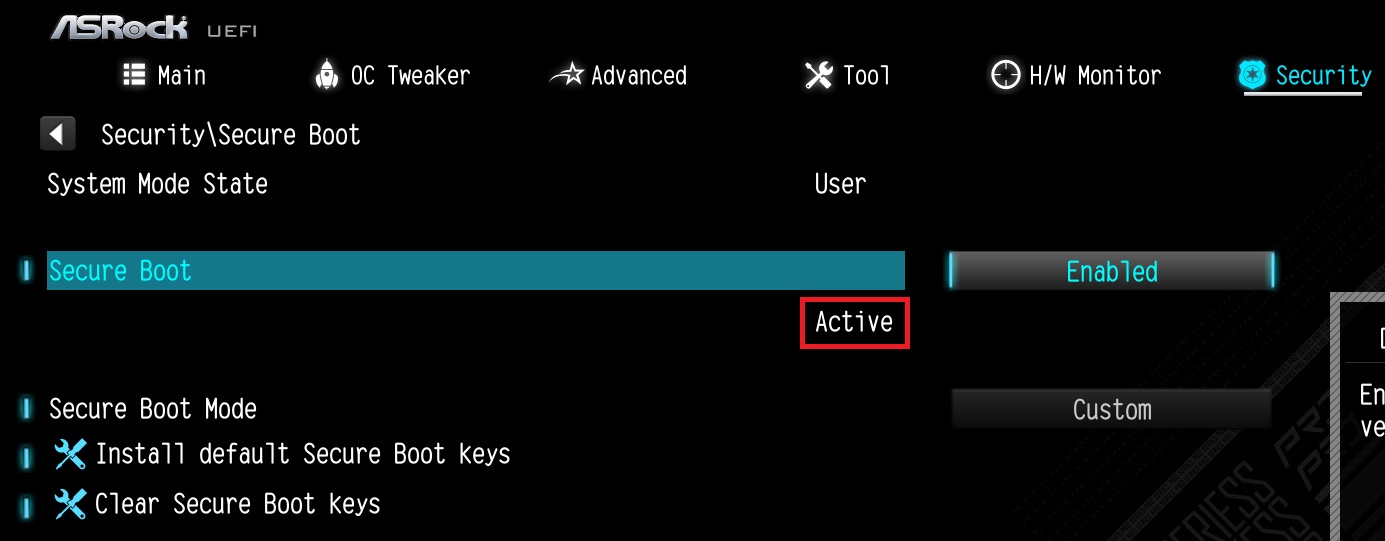
Set "Secure Boot" to "Enabled". Then press the "F10" key to save configuration changes.
Step 5.
After the system restarts, go to Security\Secure Boot, and make sure that Secure Boot is showing "Active".
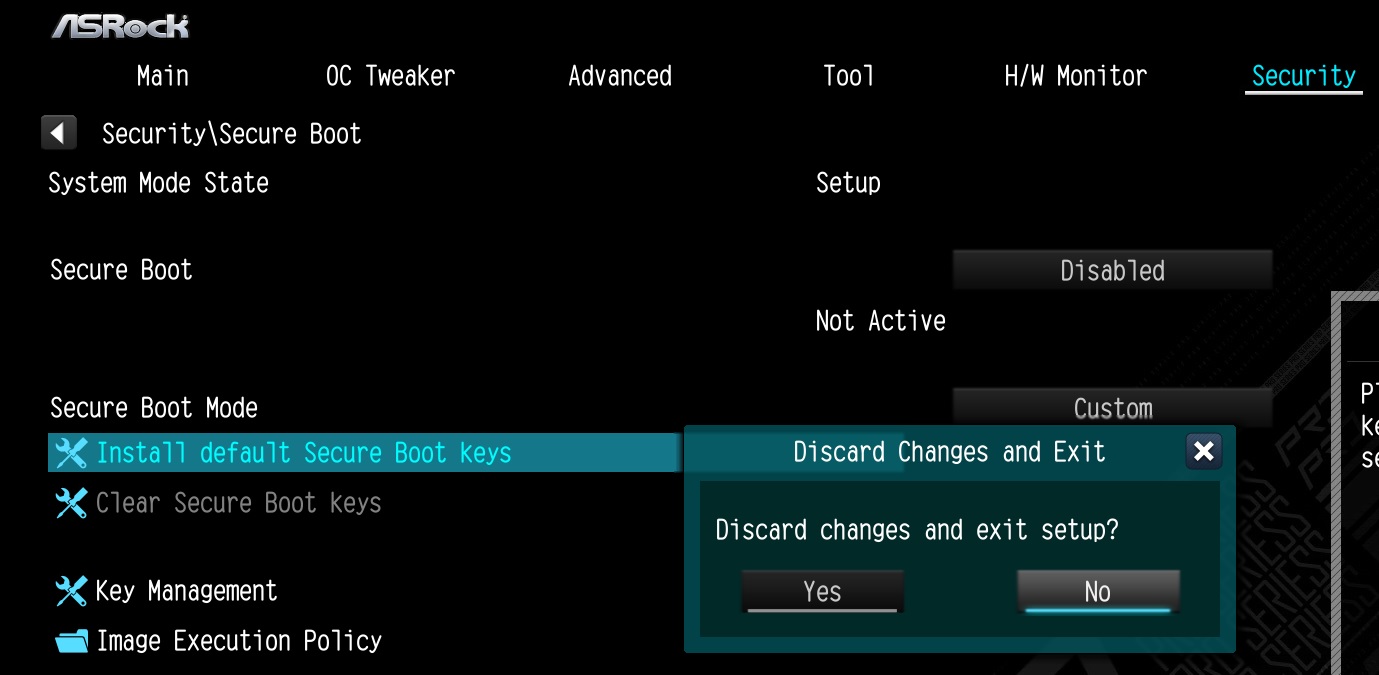
*AM5 platform
If a prompt "Discard Changes and Exit" appears after clicking "Install default Secure Boot keys" and selecting "Yes", please select "No" and continue to step 4.
P (Q&A-175|530):
When I installed the APU+AMD GPU on the AMD AM4 platform, the "Record & Stream" icon disappears in AMD Radeon software after disabling the CSM. How can I fix it?(6/30/2023)
R:Please follow the steps below to disable the iGPU.
This problem happens when using an AM4 motherboard and APU (CPU with integrated graphics), if you also have an AMD discrete graphics card and the Compatibility Support Module (CSM) is disabled in BIOS.
1. Go to BIOS\Advanced\AMD CBS\NBIO Common Options\GFX Configuration and set iGPU Configuration to "Disabled”.
2. Press hotkey "F10” to save settings and exit the BIOS setup.
3. Boot into the OS and check if the "Record & Stream" menu appears in the AMD Radeon software.
P (Q&A-172|522):
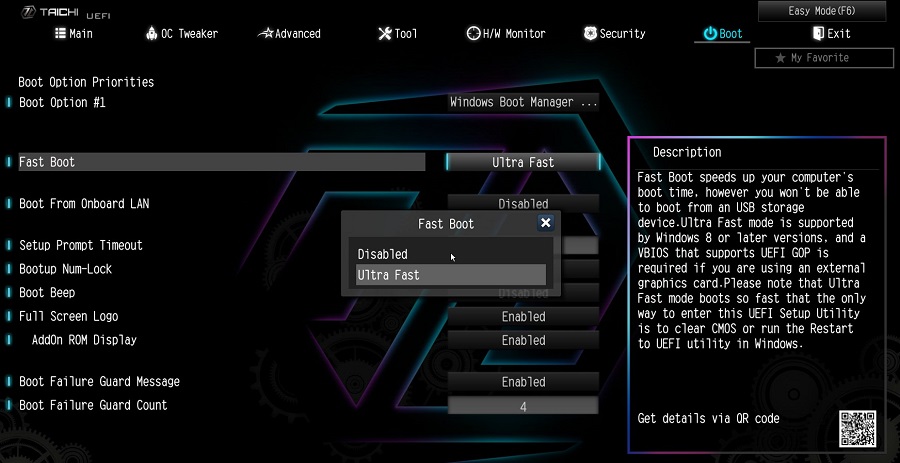
Why can I not find a CSM option under the Boot tab in BIOS?(10/13/2022)
R:When you set Fast Boot to Ultra Fast under the boot tab in BIOS, CSM (Compatibility Support Module) will be disabled and hidden automatically. This is because Ultra Fast Boot is supported only when booting in full UEFI mode, so without enabling CSM.
P (Q&A-171|520):
There is no sound output from the rear audio port. What can I do to fix it?(9/27/2022)
P (Q&A-165|509):
Why can my game not start with my Intel 600 series motherboard?(11/2/2021)
R:Some games use DRM (Digital Rights Management) protection. Please check for available updates for your game, where the DRM solution supports Alder Lake CPUs.
If the game development is discontinued and there is no update available for the DRM, please follow below steps to enable the "Legacy Game Compatibility Mode”.
Step 1.
Press [Del] or [F2] during the POST stage to boot into BIOS.
Step 2.
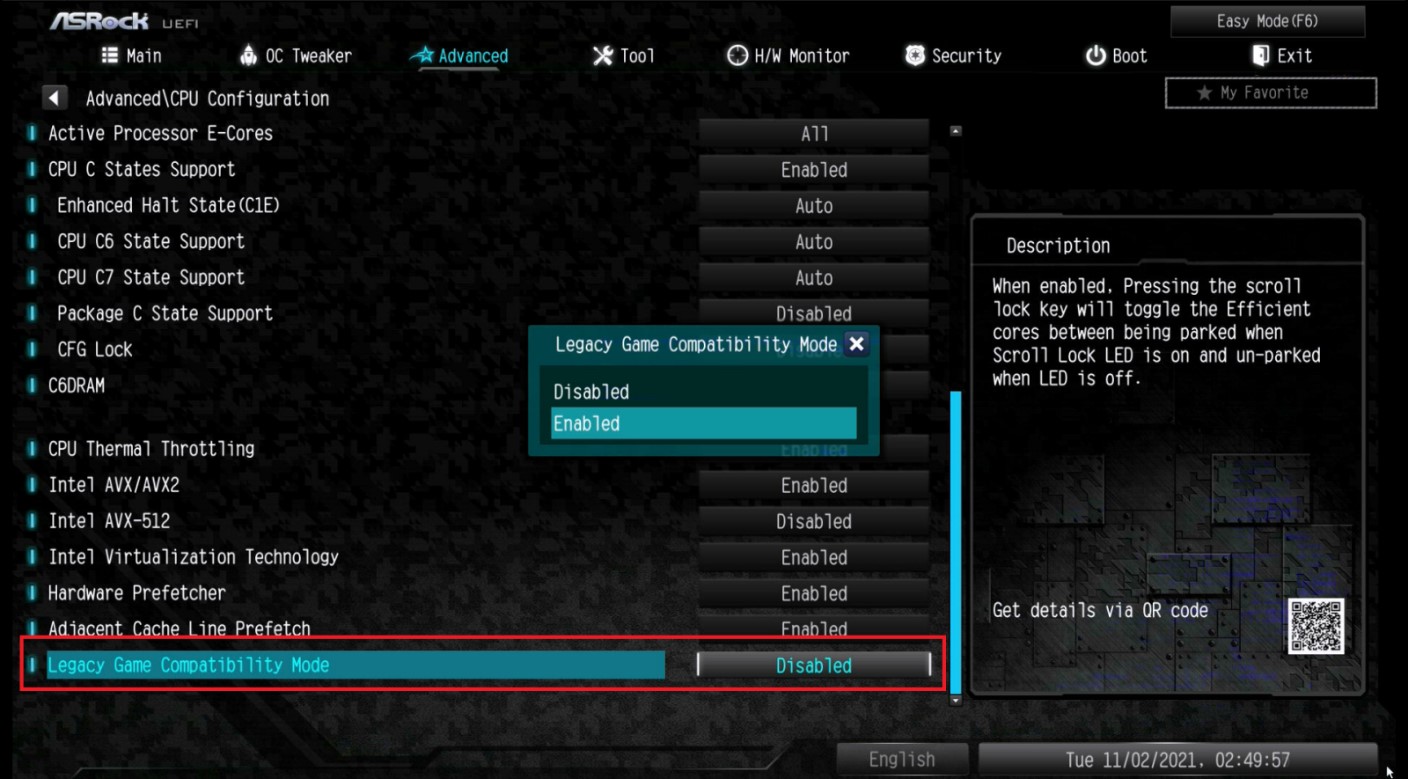
Press [F6] to enter "Advanced” mode and go to Advanced\CPU Configuration
Step 3.
Enable the "Legacy Game Compatibility Mode” in BIOS.
(The option is at the bottom of the CPU Configuration page)
Step 4.
Press [F10] to save the setting and restart the system.
Step 5.
The [Scroll Lock] key on your keyboard is now a hotkey. It can be used to enable/disable the Intel E-core parking feature. Before starting a game outdated DRM protection, please press [Scroll Lock] within the OS to enable Intel E-core parking.
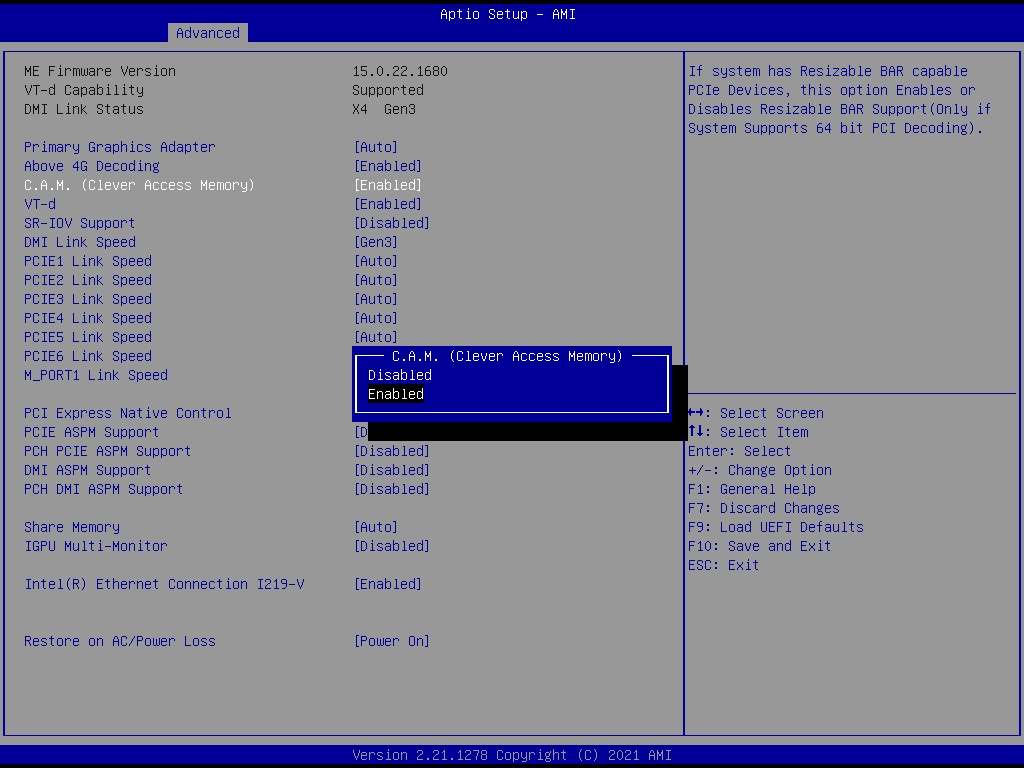
Step 2.
The C.A.M. (Clever Access Memory) option is supported when integrated graphics are disabled.
By default integrated graphics will be disabled when a PCIe graphics card is detected.
Please make sure the monitor is connected to the graphic card.
Step 3.
Please go to BIOS\Advanced\Chipset Configuration and enable "C.A.M. (Clever Access Memory)”.
Step 4.
Press F10 to save the setting and restart.
P (Q&A-162|501):
I want to turn off the LED while the system is off. Where can I find the setting?(7/1/2021)
R:Please follow the steps below and set the "Turn on Onboard LED in S5” setting to disabled under the BIOS.
Step 1.
While the system is starting, press hotkey "F2” or "Del” repeatedly to enter BIOS setup.
Step 2.
Disable the "Turn On Onboard LED in S5” under the BIOS.
AMD platform: Advanced\Onboard Devices Configuration\Turn On Onboard LED in S5\Disabled
Intel platform: Advanced\Chipset Configuraiton\Turn on Onboard LED in S5\Disabled
Step 3.
Press hotkey "F10” to save the changes.
P (Q&A-140|466):
¿Cómo funcionan las funciones de recuperación de BIOS y Backup UEFI segura en las placas base Intel H170 con dos chips ROM de BIOS?(6/1/2018)
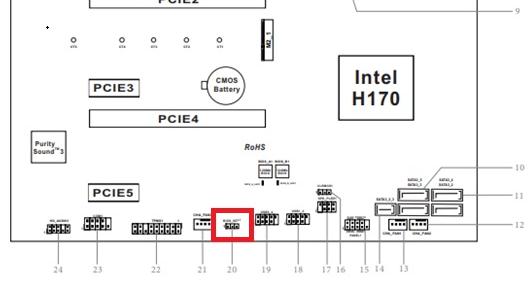
R:Para las placas base Intel H170 con dos chips ROM de BIOS, si la BIOS principal (BIOS_A1) está dañada, siga los pasos a continuación para recuperar la BIOS principal.
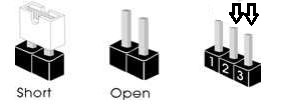
Paso 1. Por favor desenchufe el cable de alimentación y mueva el jumper del pin2 y pin3 en el encabezado "BIOS_SEL1”.
Paso 2. Por favor enchufe el cable de alimentación y arranque la BIOS(BIOS_B1).
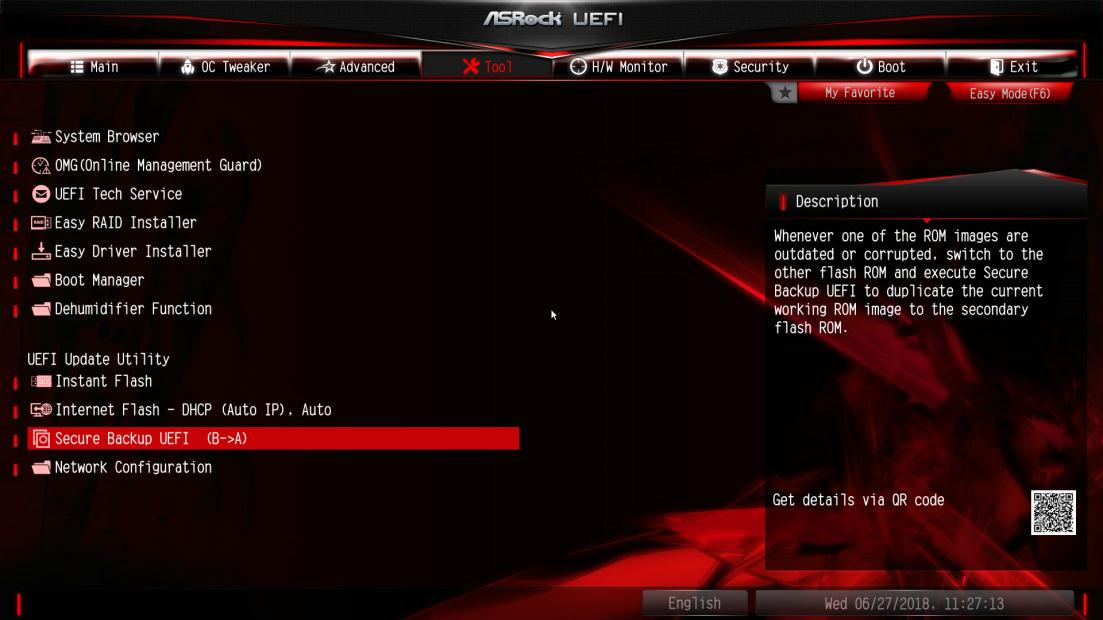
Paso 3. Clic Secure Backup UEFI (B->A). Esto copiará el archivo backup BIOS en el archivo principal BIOS.
Paso 4. Despues de actualizar la BIOS, quite el cable de alimentación y mueva el tapón del Puente pin1 y pin2
Paso 5. Enchufe el cable de alimentación y el sistema se reiniciará con el archive de la BIOS principal
P (Q&A-132|444):
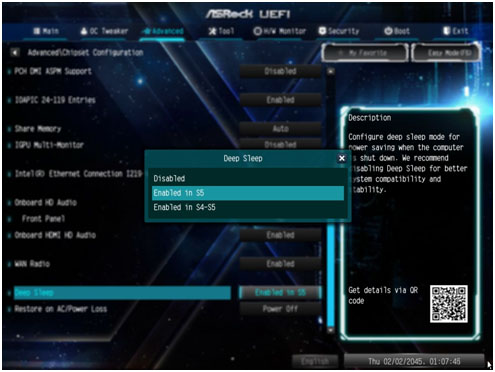
¿Cómo desactivo la alimentación del puerto USB en el modo S5?(7/1/2017)
R:La alimentación del Puerto USB se puede apagar activando la opción "Deep Sleep”.
Por favor presione "F2” o "Del” durante el Arranque para entrar en la configuración de la BIOS, seleccione el menú "Advanced” y entre en la página "Chipset Configuration”, y ajuste la opción "Deep Sleep” para desactivar la opción en S5.
After adjusting the setting, press "F10” to save the configuration. Then USB port power will be turned off under S5 mode.
P (Q&A-132|445):
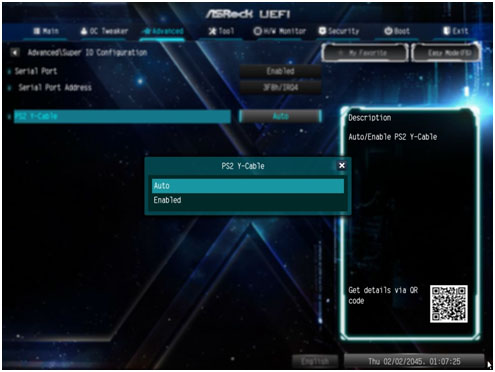
Me gustaría usar el ratón PS2 en el puerto PS2. ¿Qué debo hacer?(7/1/2017)
R:Si su placa base tiene dos puertos PS2, simplemente conecte el ratón PS2 en el Puerto PS2 verde, y podrá utilizar el ratón PS2.
Si su placa base solo tiene un Puerto PS2, por favor seleccione "PS2 Y-cable” a "Enabled (habilitado)”. Por favor presione "F2” o "Del” durante el arranque para entrar en la BIOS, seleccione el menú "Advanced”, "Super IO Configuration”, y establezca la opción "PS2 Y-cable” a "Enabled”. Presione "F10” para guardar la configuración. Entonces podrá usar el ratón PS2.
P (Q&A-131|440):
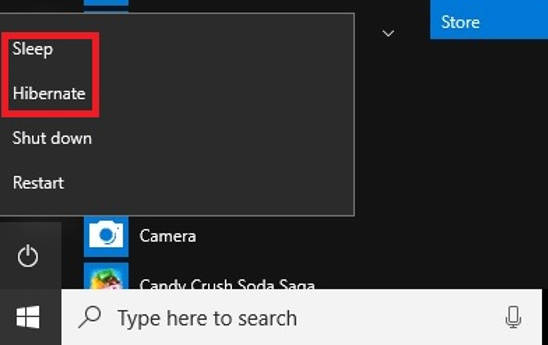
Quiero usar la función USB Power On en la placa Serie AM4, ¿cómo la configuro? (6/1/2017)
R:La función de Encendido USB es compatible con los modos de Suspensión (S3) e Hibernación (S4) bajo Sistema Operativo Windows.
Por favor haga clic en el botón del menú Inicio y seleccione Suspender (S3 modo) e Hibernar (S4 modo) bajo Windows.
P (Q&A-128|423):
¿Cómo puedo actualizar la BIOS en la plataforma AM4 con ASRock Instant Flash?(3/1/2017)
R:Ya que AMD AM4 es una nueva estructura y acabamos de encontrar BIOS no puede ser completamente actualizado por nuestro Instant Flash. Por lo tanto, para la antigua versión de la BIOS lanzada antes del 07/03/2017, no existe la opción "Instant Flash" en la BIOS. Para asegurarse de que la actualización de la BIOS se puede ejecutar por completo, utilice los métodos de actualización de DOS o BIOS de Windows para actualizar temporalmente. Después de actualizar a la siguiente versión, las funciones y opciones de Instant Flash son compatibles con BIOS y se puede utilizar para actualizar el archivo BIOS más reciente en el futuro.
Modelo
Versión BIOS
Fatal1ty X370 Professional Gaming
P1.50
X370 Taichi
P1.50
X370 Killer SLI/ac
P1.60
X370 Killer SLI
P1.60
Fatal1ty X370 Gaming K4
P1.60
Fatal1ty AB350 Gaming K4
P1.40
AB350 Pro4
P1.40
AB350M
P1.20
P (Q&A-129|429):
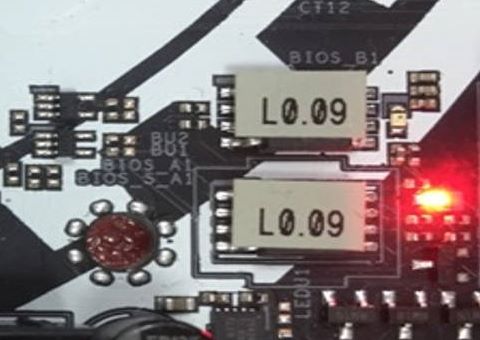
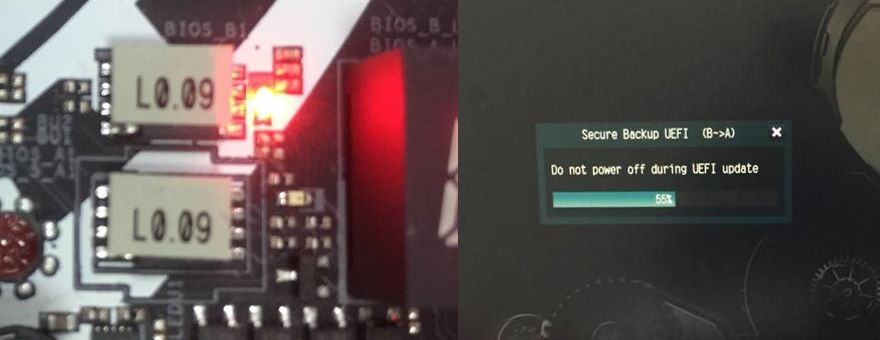
¿Cómo funcionan las funciones de recuperación de BIOS y Secure Backup UEFI con las placas base Intel Z270 con dos chips BIOS ROM?(2/1/2017)
R:Para las placas base Intel Z270 con dos chips BIOS ROM, no hay necesidad de cambiar la ROM de la BIOS cuando hace la recuperación.
Al arrancar correctamente, el sistema funciona en BIOS_A1 activo, como se muestra a continuación
Sin embargo, si BIOS_A1 activo está corrupta o dañado, después de varios intentos de arranque fallidos, automáticamente realizará la recuperación de la copia de seguridad de la BIOS desde BIOS_B1 y el sistema seguirá funcionando en BIOS_A1 activo. Y el monitor mostrará la función Secure Backup UEFI (B -> A) como se muestra en la siguiente imagen.
Después de terminar esta función, el sistema se reiniciará y funcionará en el BIOS_A1 activo.
 Menú
Menú