Usamos cookies para oferecer uma experiência mais personalizada e suave. Ao visitar este site, você concorda com o nosso uso de cookies. Se preferir não aceitar cookies ou exigir mais informações, visite nossa Política de Privacidade.
Cookies necessários Estes cookies são essenciais para o correto funcionamento do site e não podem ser desativados.
Cookies analíticos Estes cookies ajudam-nos a entender como os visitantes usam o nosso site.
Cookies de marketing Estes cookies são utilizados para rastrear visitantes e exibir anúncios relevantes.
Cookies de redes sociais Estes cookies permitem partilhar páginas e conteúdos nas redes sociais.
Caso você saiba a categoria da sua dúvida, você pode escolher uma das categorias abaixo para perguntas frequentes. Catalogo:
Resultados:
Q (549):
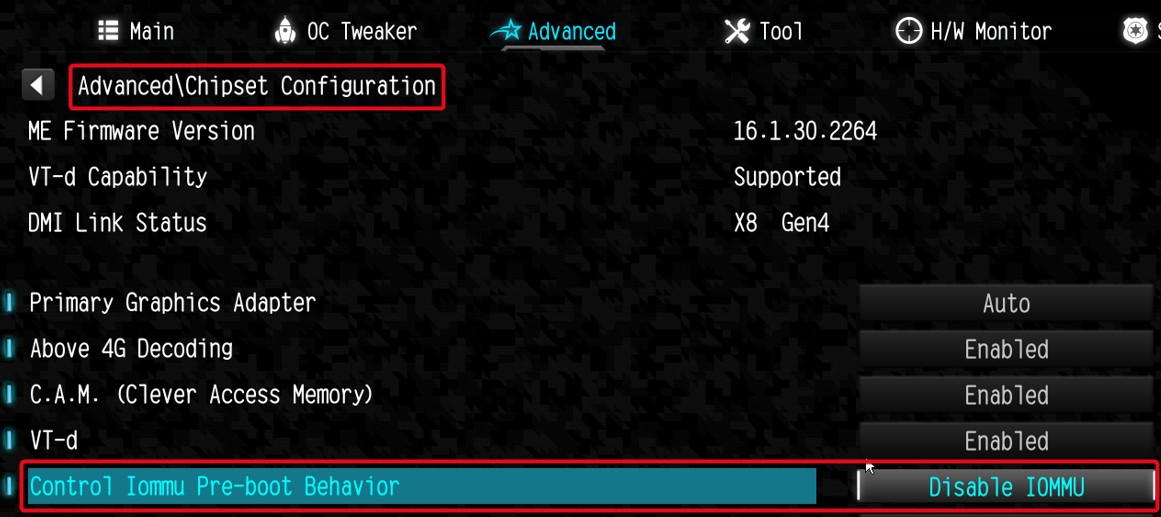
I am looking for Pre-boot DMA Protection option, but I cannot find it in the BIOS interface. Where can I locate this option?(12/16/2025)
A:The option name varies across different platforms. Please refer to the following screenshots to identify the correct option and its location in the BIOS menu.
Intel platform
● Intel 600, 700 series
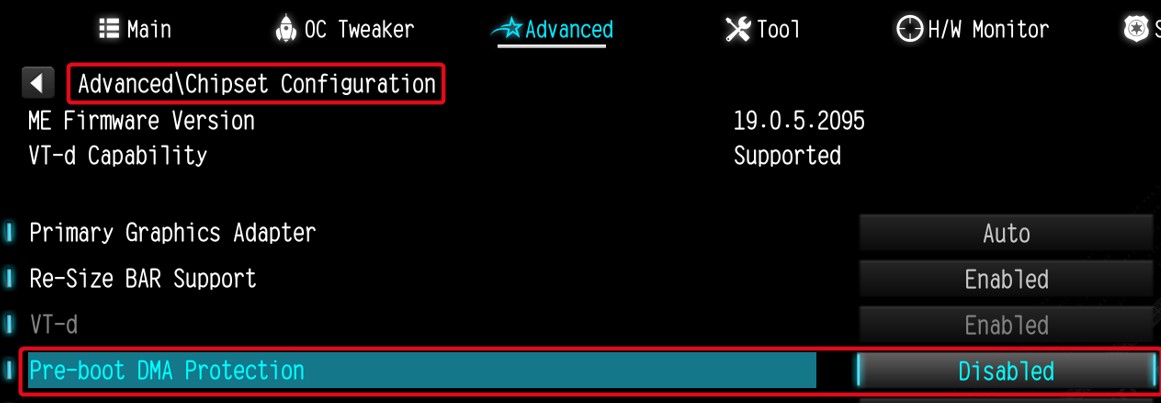
● Intel 800 series
Note:
Please first update BIOS to the latest version to obtain this option on Intel 600, 700 and 800 platforms.
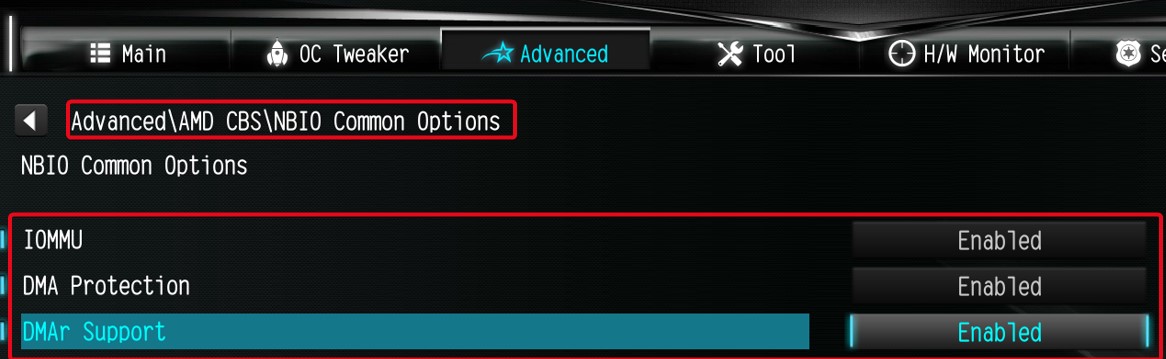
AMD Platform
● AM4 series
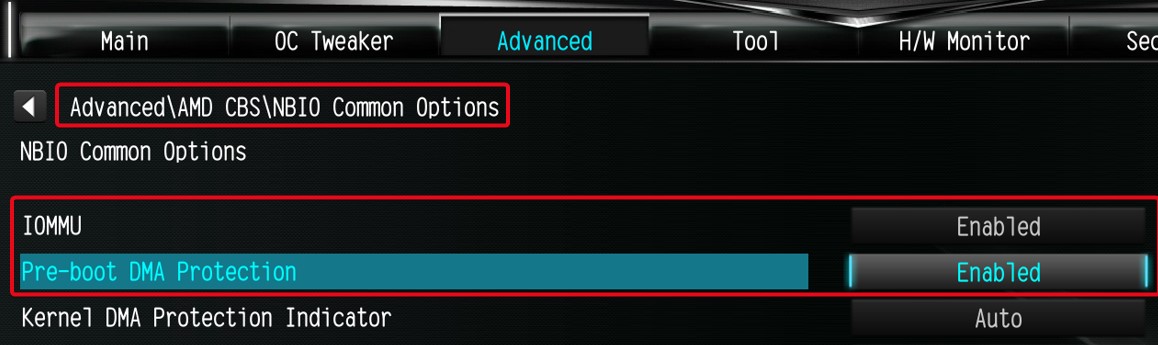
● AM5 series
Users can enable this option if they encounter game‑related or security‑related problems.
#DMA #Pre-boot #IOMMU #DMA Protection
Q (536):
How can I allow the cTDP of my 9700X/9600X to boost to 105W?(9/20/2024)
A:To adjust the cTDP of the 9700X/9600X to 105W, please download a BIOS version with AGESA code 1.2.0.2 or later from ASRock's official website.
After updating the BIOS, go to OC Tweaker and enable the option to set the TDP to 105W. Please note that not all AM5 motherboards might support this option.
#9700X #9600X #AM5 #X670 #TDP #105
Q (531):
My software requires Secure Boot to be enabled. How can I set it up?(8/16/2023)
A:Please follow the steps below to enable Secure Boot.
Step 1.
Please press the "F2” key during POST to enter BIOS setup.
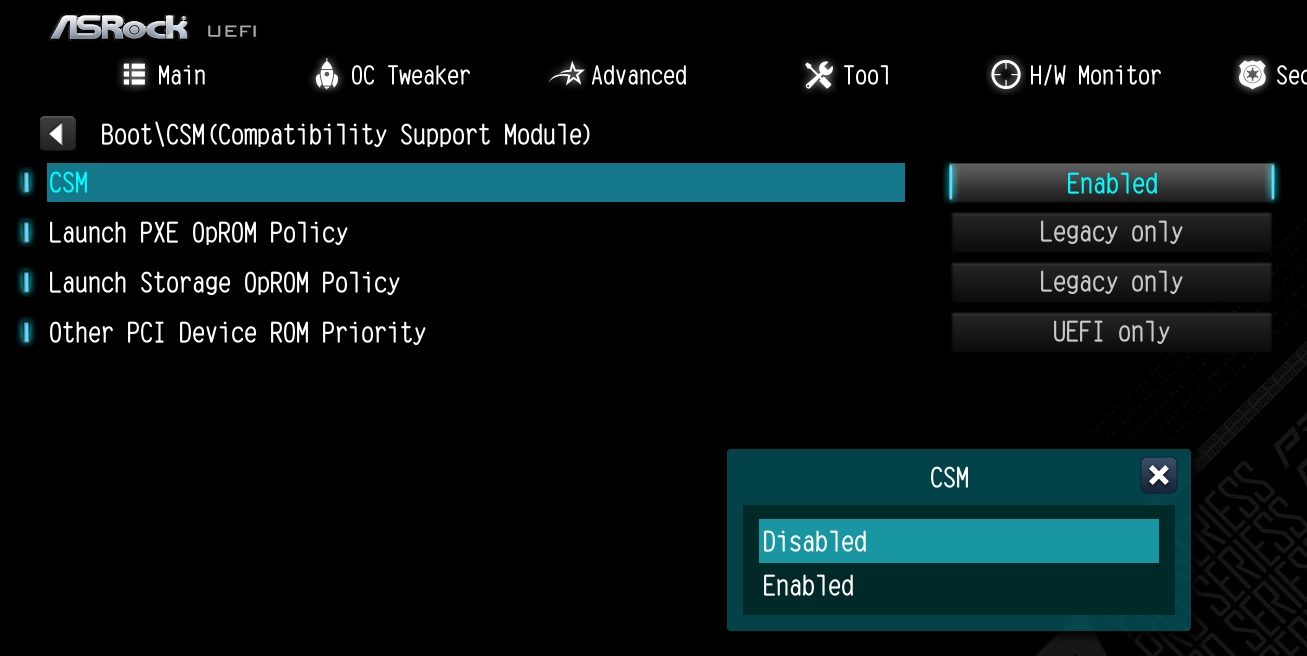
Go to Boot\CSM (Compatibility Support Module) and set "CSM" to "Disabled".
Press the "F10” key to save configuration changes.
Step 2.
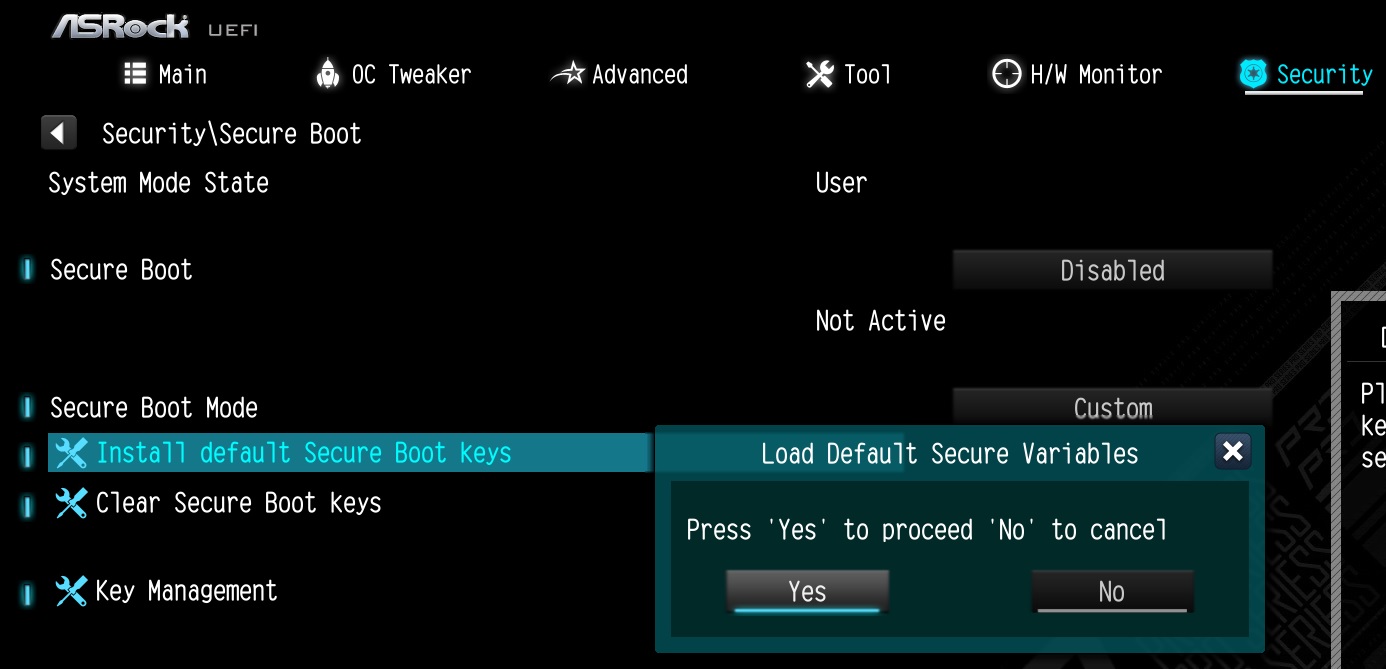
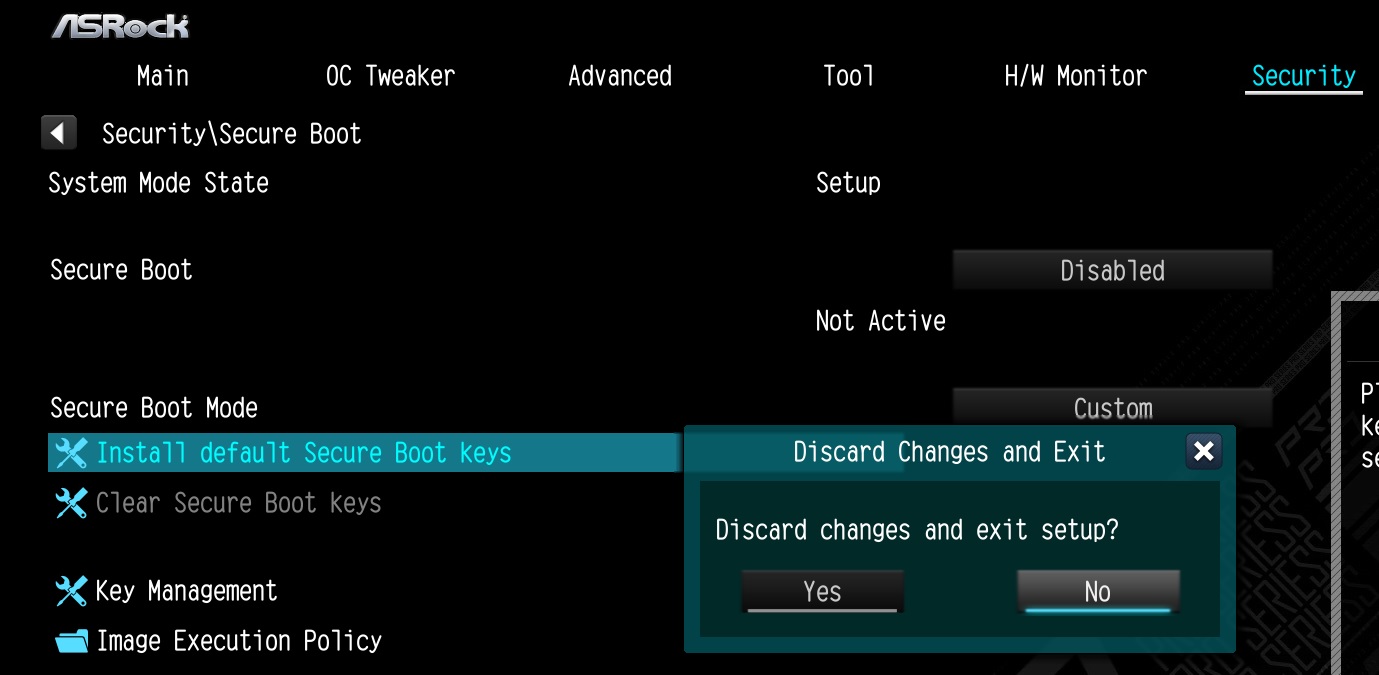
Go to Security\Secure Boot and set "Secure Boot Mode" to "Custom".
Step 3.
Please press "Install default Secure Boot keys" and select "Yes" to install Secure Boot keys.
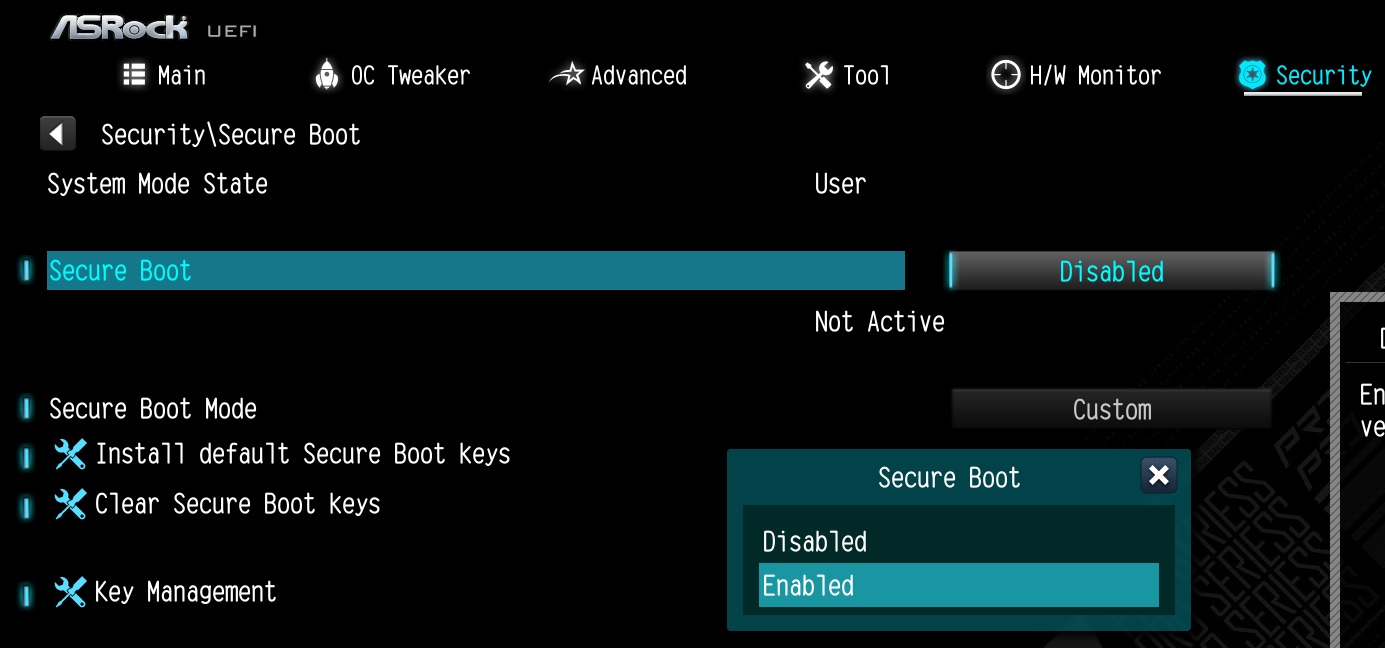
Step 4.
Set "Secure Boot" to "Enabled". Then press the "F10" key to save configuration changes.
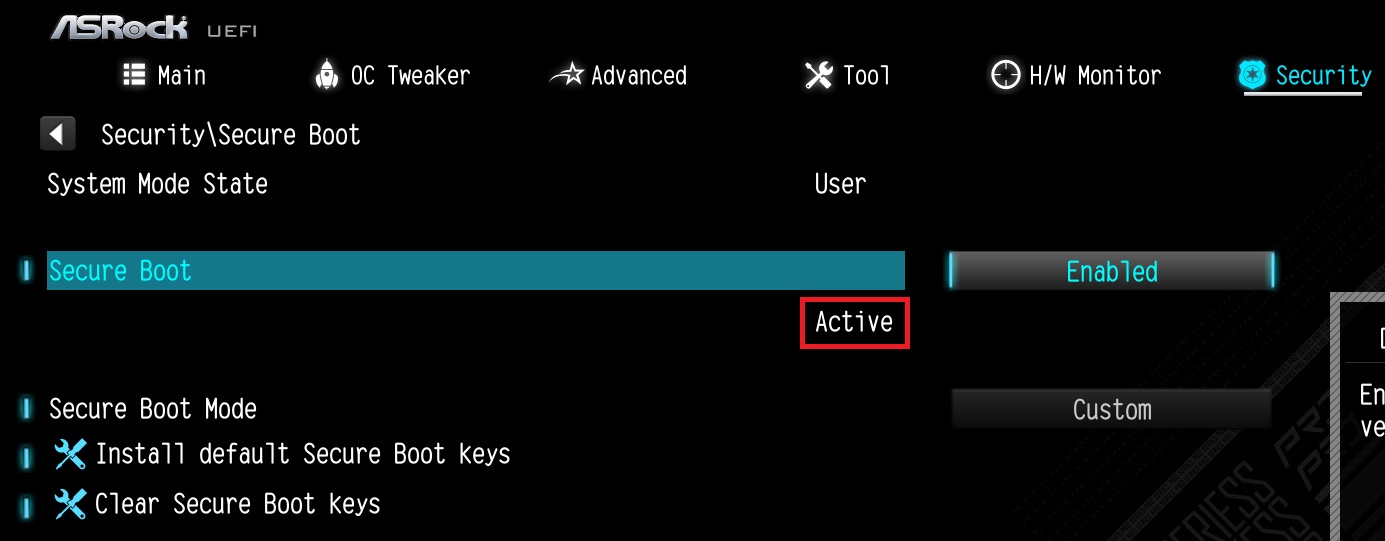
Step 5.
After the system restarts, go to Security\Secure Boot, and make sure that Secure Boot is showing "Active".
*AM5 platform
If a prompt "Discard Changes and Exit" appears after clicking "Install default Secure Boot keys" and selecting "Yes", please select "No" and continue to step 4.
Q (530):
When I installed the APU+AMD GPU on the AMD AM4 platform, the "Record & Stream" icon disappears in AMD Radeon software after disabling the CSM. How can I fix it?(6/30/2023)
A:Please follow the steps below to disable the iGPU.
This problem happens when using an AM4 motherboard and APU (CPU with integrated graphics), if you also have an AMD discrete graphics card and the Compatibility Support Module (CSM) is disabled in BIOS.
1. Go to BIOS\Advanced\AMD CBS\NBIO Common Options\GFX Configuration and set iGPU Configuration to "Disabled”.
2. Press hotkey "F10” to save settings and exit the BIOS setup.
3. Boot into the OS and check if the "Record & Stream" menu appears in the AMD Radeon software.
Q (522):
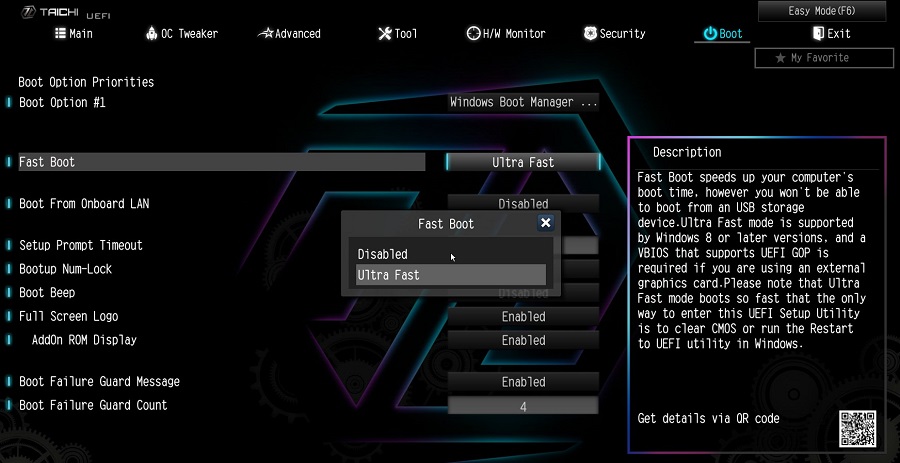
Why can I not find a CSM option under the Boot tab in BIOS?(10/13/2022)
A:When you set Fast Boot to Ultra Fast under the boot tab in BIOS, CSM (Compatibility Support Module) will be disabled and hidden automatically. This is because Ultra Fast Boot is supported only when booting in full UEFI mode, so without enabling CSM.
Q (520):
There is no sound output from the rear audio port. What can I do to fix it?(9/27/2022)
Q (509):
Why can my game not start with my Intel 600 series motherboard?(11/2/2021)
A:Some games use DRM (Digital Rights Management) protection. Please check for available updates for your game, where the DRM solution supports Alder Lake CPUs.
If the game development is discontinued and there is no update available for the DRM, please follow below steps to enable the "Legacy Game Compatibility Mode”.
Step 1.
Press [Del] or [F2] during the POST stage to boot into BIOS.
Step 2.
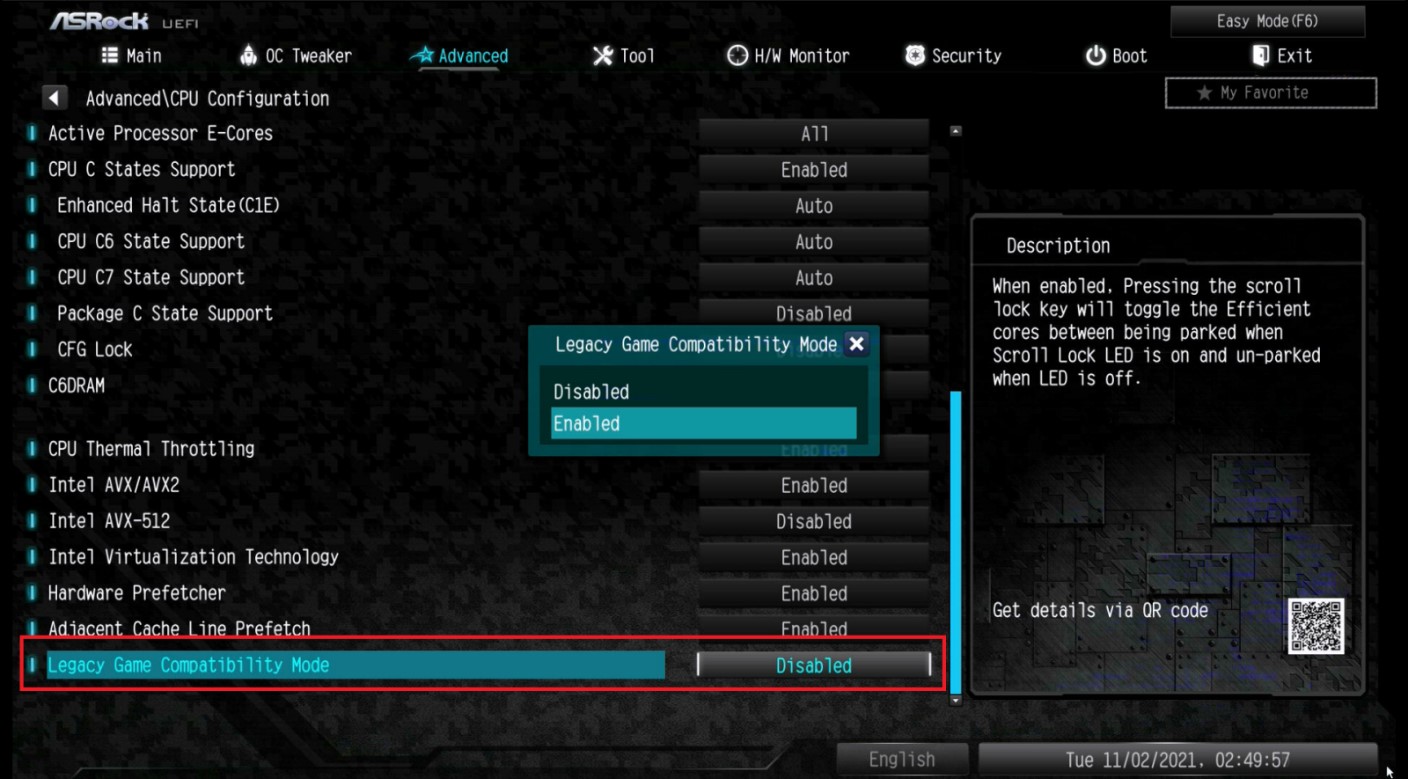
Press [F6] to enter "Advanced” mode and go to Advanced\CPU Configuration
Step 3.
Enable the "Legacy Game Compatibility Mode” in BIOS.
(The option is at the bottom of the CPU Configuration page)
Step 4.
Press [F10] to save the setting and restart the system.
Step 5.
The [Scroll Lock] key on your keyboard is now a hotkey. It can be used to enable/disable the Intel E-core parking feature. Before starting a game outdated DRM protection, please press [Scroll Lock] within the OS to enable Intel E-core parking.
Step 2.
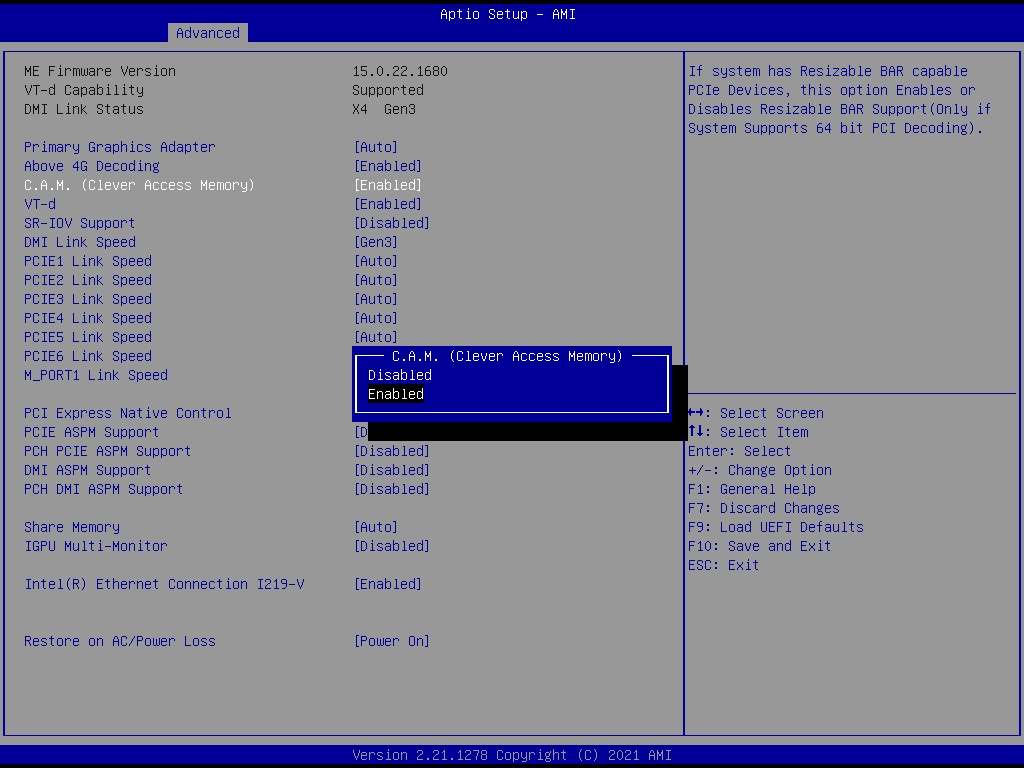
The C.A.M. (Clever Access Memory) option is supported when integrated graphics are disabled.
By default integrated graphics will be disabled when a PCIe graphics card is detected.
Please make sure the monitor is connected to the graphic card.
Step 3.
Please go to BIOS\Advanced\Chipset Configuration and enable "C.A.M. (Clever Access Memory)”.
Step 4.
Press F10 to save the setting and restart.
Q (501):
I want to turn off the LED while the system is off. Where can I find the setting?(7/1/2021)
A:Please follow the steps below and set the "Turn on Onboard LED in S5” setting to disabled under the BIOS.
Step 1.
While the system is starting, press hotkey "F2” or "Del” repeatedly to enter BIOS setup.
Step 2.
Disable the "Turn On Onboard LED in S5” under the BIOS.
AMD platform: Advanced\Onboard Devices Configuration\Turn On Onboard LED in S5\Disabled
Intel platform: Advanced\Chipset Configuraiton\Turn on Onboard LED in S5\Disabled
Step 3.
Press hotkey "F10” to save the changes.
Q (466):
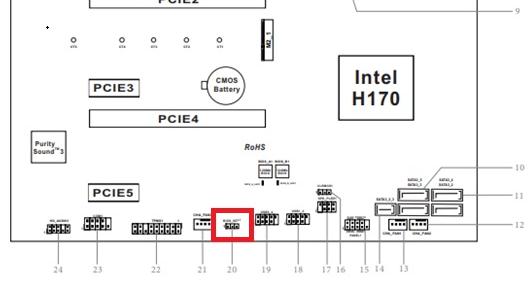
Como as funções BIOS recovery e secure Backup UEFI funcionam nas placas-mãe Intel H170 com dois chips de BIOS?(6/1/2018)
A:Para as placas-mãe Intel H170 com dois chips de BIOS, se a BIOS principal (BIOS_A1) estiver corrompida por favor siga os passos abaixo para recuperar a BIOS.
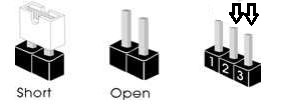
Passo 1. Por favor desconecte o cabo de energia e mova o jumper para os pinos pin2 e pin3 no conector "BIOS_SEL1”.
Para as placas-mãe Intel H170 com dois chips de BIOS, se a BIOS principal (BIOS_A1) estiver corrompida por favor siga os passos abaixo para recuperar a BIOS.
Passo 1. Por favor desconecte o cabo de energia e mova o jumper para os pinos pin2 e pin3 no conector "BIOS_SEL1”.
Passo 4. Após atualizar a BIOS, por favor remova o cabo de energia e mova o jumper para os pinos pin1 e pin2 (conector BIOS_SEL1)
Passo 5. Conete o cabo de energia e o sistema deverá iniciar com a BIOS principal
Q (444):
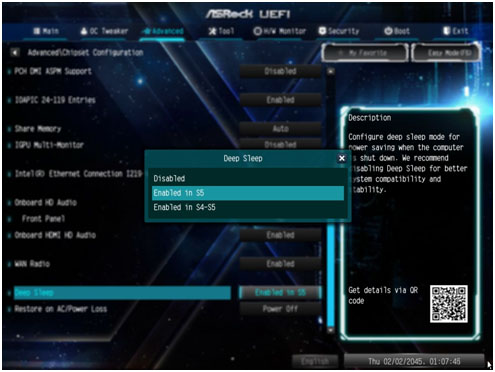
Como eu desligo a alimentação da porta USB no modo S5?(7/1/2017)
A:A alimentação da porta USB pode ser desligada ativando a opção "Deep Sleep”.
Por favor pressione "F2” ou "Del” durante o POST para acessar a BIOS, selecione "Advanced” e então entre em "Chipset Configuration”, e ajuste a opção "Deep Sleep” para "Enabled in S5”.
Após ajustar a configuração, pressione "F10” para salvar a configuração. E então a alimentação da porta USB será desabilitada em modo S5.
Q (445):
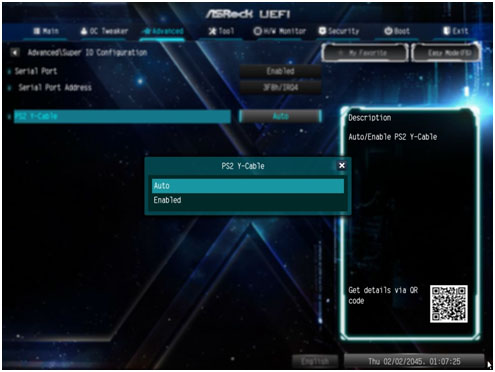
Eu gostaria de usar um mouse PS2 na porta PS2. O que eu devo fazer?(7/1/2017)
A:Se a sua placa-mãe tiver duas portas PS2, simplesmente conecte o mouse PS2 na porta PS2 verde, e o mouse PS2 poderá ser utilizado.
Se a sua placa-mãe tiver apenas uma porta PS2 port, por favor defina "PS2 Y-cable” para "Enabled”. Por favor pressione "F2” ou "Del” durante o POST para acessar a BIOS, selecione "Advanced”, "Super IO Configuration”, e defina a opção "PS2 Y-cable” para "Enabled”. Pressione "F10” para salvar a configuração. E então o mouse PS2 poderá ser utilizado.
Q (440):
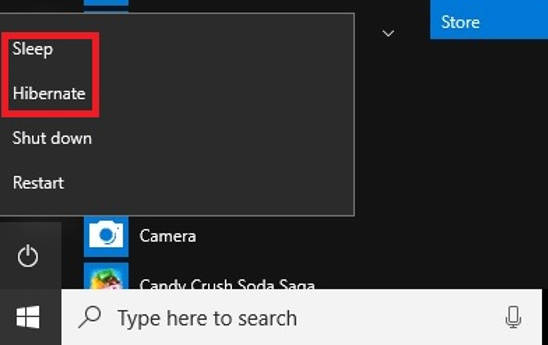
Eu quero utilizar a função USB Power On nas placas da série AM4, como eu configuro? (6/1/2017)
A:A função USB power On é suportada sob os modos Suspender (S3) e Hibernar (S4) no sistema Windows.
Por favor clique no botão Iniciar e então escolha Suspender (modo S3) e Hibernar (modo S4) no Windows.
Q (423):
W jaki sposób mogę dokonać aktualizacji BIOS dzięki narzędziu ASRock Instant Flash na platformie AM4?(3/1/2017)
A:Since AMD AM4 is a new structure and we just found BIOS cannot be completely updated by our Instant Flash. Thus, for the old BIOS version released before 2017/03/07, there is no "Instant Flash” option under BIOS. To make sure BIOS update can be executed completely, please use DOS or Windows BIOS update methods to do update temporarily.
After updating to the following version, Instant Flash functions and options are supported under BIOS and it can be used for updating the newer BIOS file in the future.
Model
BIOS Version
Fatal1ty X370 Professional Gaming
P1.50
X370 Taichi
P1.50
X370 Killer SLI/ac
P1.60
X370 Killer SLI
P1.60
Fatal1ty X370 Gaming K4
P1.60
Fatal1ty AB350 Gaming K4
P1.40
AB350 Pro4
P1.40
AB350M
P1.20
Q (429):
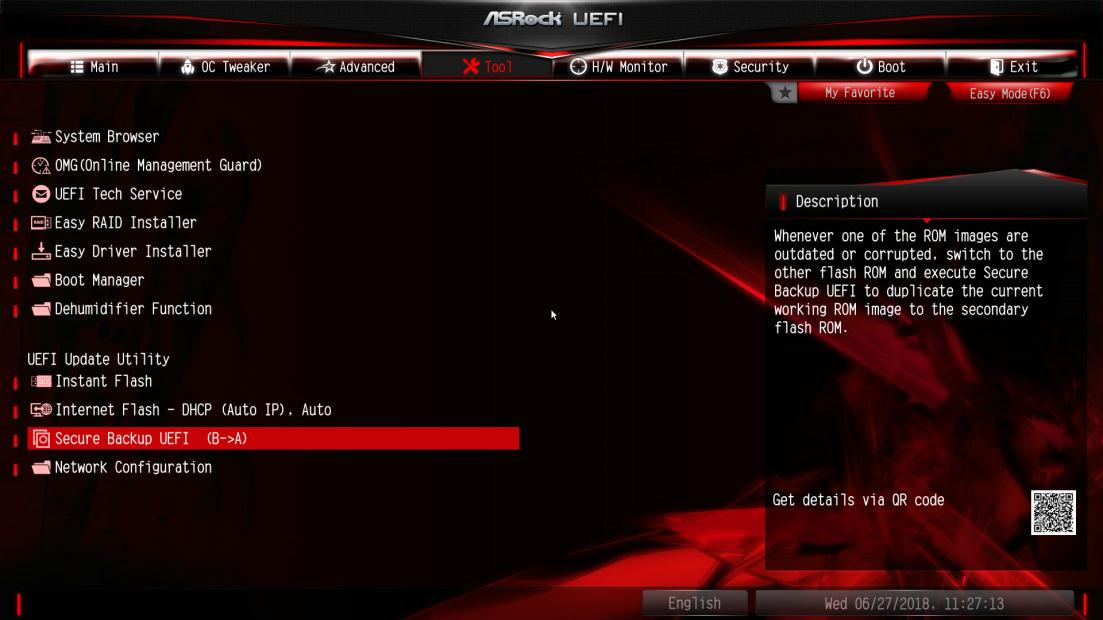
Como as funções de BIOS Recovery e Secure Backup UEFI funcionam com as placas-mãe Intel Z270 com dois chips ROM de BIOS?(2/1/2017)
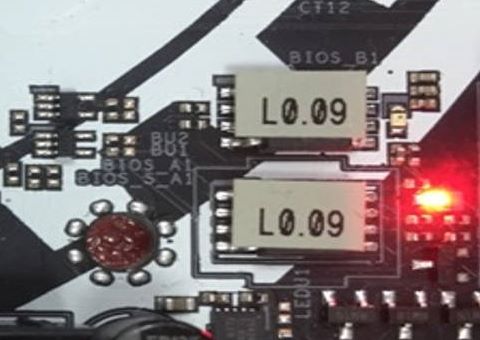
A:Para as placas-mãe Intel Z270 com dois chips ROM de BIOS, não há necessidade alternar a BIOS quando fizer uma recuperação.
Ao iniciar corretamente, o sistema funciona na BIOS_A1 conforme imagem abaixo.
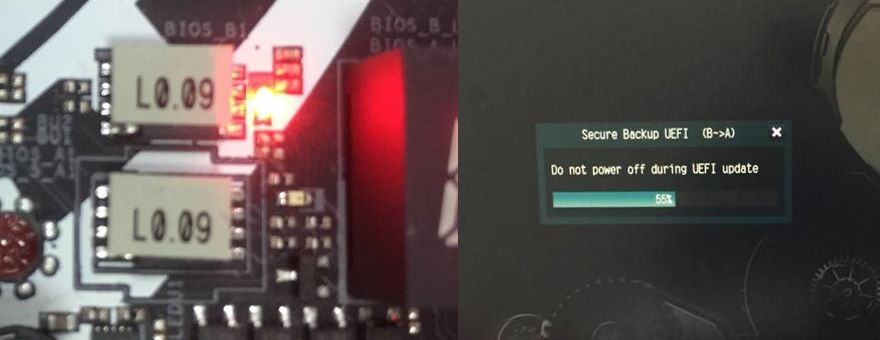
No entanto, se a BIOS_A1 estiver corrompida ou danificada, após diversas tentativas falhas de boot, ela fará automaticamente a recuperação de BIOS a partir da BIOS_B1 de backup e então o sistema ainda irá funcionar na BIOS_A1. E o monitor irá exibir a função Secure Backup UEFI (B-->A) conforme a imagem abaixo.
Após finalizar esta função, o sistema irá reiniciar e funcionar na BIOS ativa BIOS_A1.
 Cardápio